
Just how to Fix a Leaky Faucet and a Noisy Radiator
Taking care of a dripping faucet or a loud radiator can be a genuine headache, however do not worry - you will obtain the inside scoop on exactly how to deal with these typical household concerns. Whether it's the constant drip maintaining you up at night or that rattling audio driving you insane, there's a remedy that'll have your home running efficiently in no time at all. All you need is the right method and a few handy devices. So, let's jump in and obtain those issues fixed at last.
Secret Takeaways
- Identify the kind of tap and gather the necessary tools, including a basin wrench, pliers, and a substitute tap kit, to efficiently disassemble and fix the tap.
- Shut off the water before taking apart the tap, and very carefully get rid of and evaluate the washers or O-rings to replace any type of worn or damaged elements.
- Detect the resource of radiator sound, which could be from the valves, pipelines, or the radiator itself, and hemorrhage the radiator to get rid of trapped air and enhance home heating effectiveness.
- Routinely check the radiator for leaks and do maintenance, including flushing, to stop mineral accumulation and lower sound.
- Reassemble the faucet elements meticulously, making sure correct positioning and tightness, to get rid of any remaining leaks after turning the water supply back on.
Determining the Tap Type
The initial step in fixing a leaky faucet is to determine its type.
You'll need to remove the faucet manage and check out the interior elements to identify if it's a compression, cartridge, ceramic disc, or ball-type tap.
Compression faucets utilize washing machines that can end up being put on gradually, causing leakages.
Cartridge faucets, on the other hand, have a single-piece cartridge that regulates the water flow and can be easily changed if damaged.
Ceramic disc taps use a pair of ceramic discs to control the flow, and these can end up being damaged or put on, triggering leakages.
Ball-type taps use a sphere mechanism to manage the water, and a used or broken sphere can also result in leaks.
Once you have actually identified the faucet kind, you can purchase the appropriate replacement parts and comply with the manufacturer's guidelines to deal with the leak.
Knowing the tap kind is vital for ensuring you get the right parts and don't make any type of mistakes throughout the repair service process.
Collecting the Needed Devices
Prior to you can begin dealing with the leaking faucet, you'll need to gather the necessary tools. These generally consist of a basin wrench, a set of pliers, a screwdriver collection, and a replacement faucet set details to your faucet's kind.
The container wrench will certainly assist you loosen up and remove the tap's nuts, while the pliers and screwdriver collection will assist in taking apart the tap parts.
When it concerns device selection, select high-grade tools that are suitable for the job. This will make the repair service procedure less complicated and avoid more damages to the tap.
In addition, have a tidy, orderly workplace to assure you do not shed any type of little parts during the fixing.
Switching off the Supply Of Water
First, shut down the water to the leaking tap. This is typically done by transforming the shut-off valve situated below the sink clockwise up until it's completely closed. If you can't discover the shut-off shutoff or the tap is in a different place, you might require to switch off the primary water to your whole home.
Switching off the water system is an essential pipes fundamental when handling a leaky faucet. This assures you don't wind up with a larger mess on your hands while you work with the faucet.
As soon as the water is shut off, you can proceed to disassembling the faucet and identifying the resource of the leakage. Keep in mind to turn the water back on slowly after you've finished the repair work to look for any type of staying leakages.
Turning off the water is an easy but essential action in the faucet-fixing process, so do not miss this important piece of the plumbing essentials.
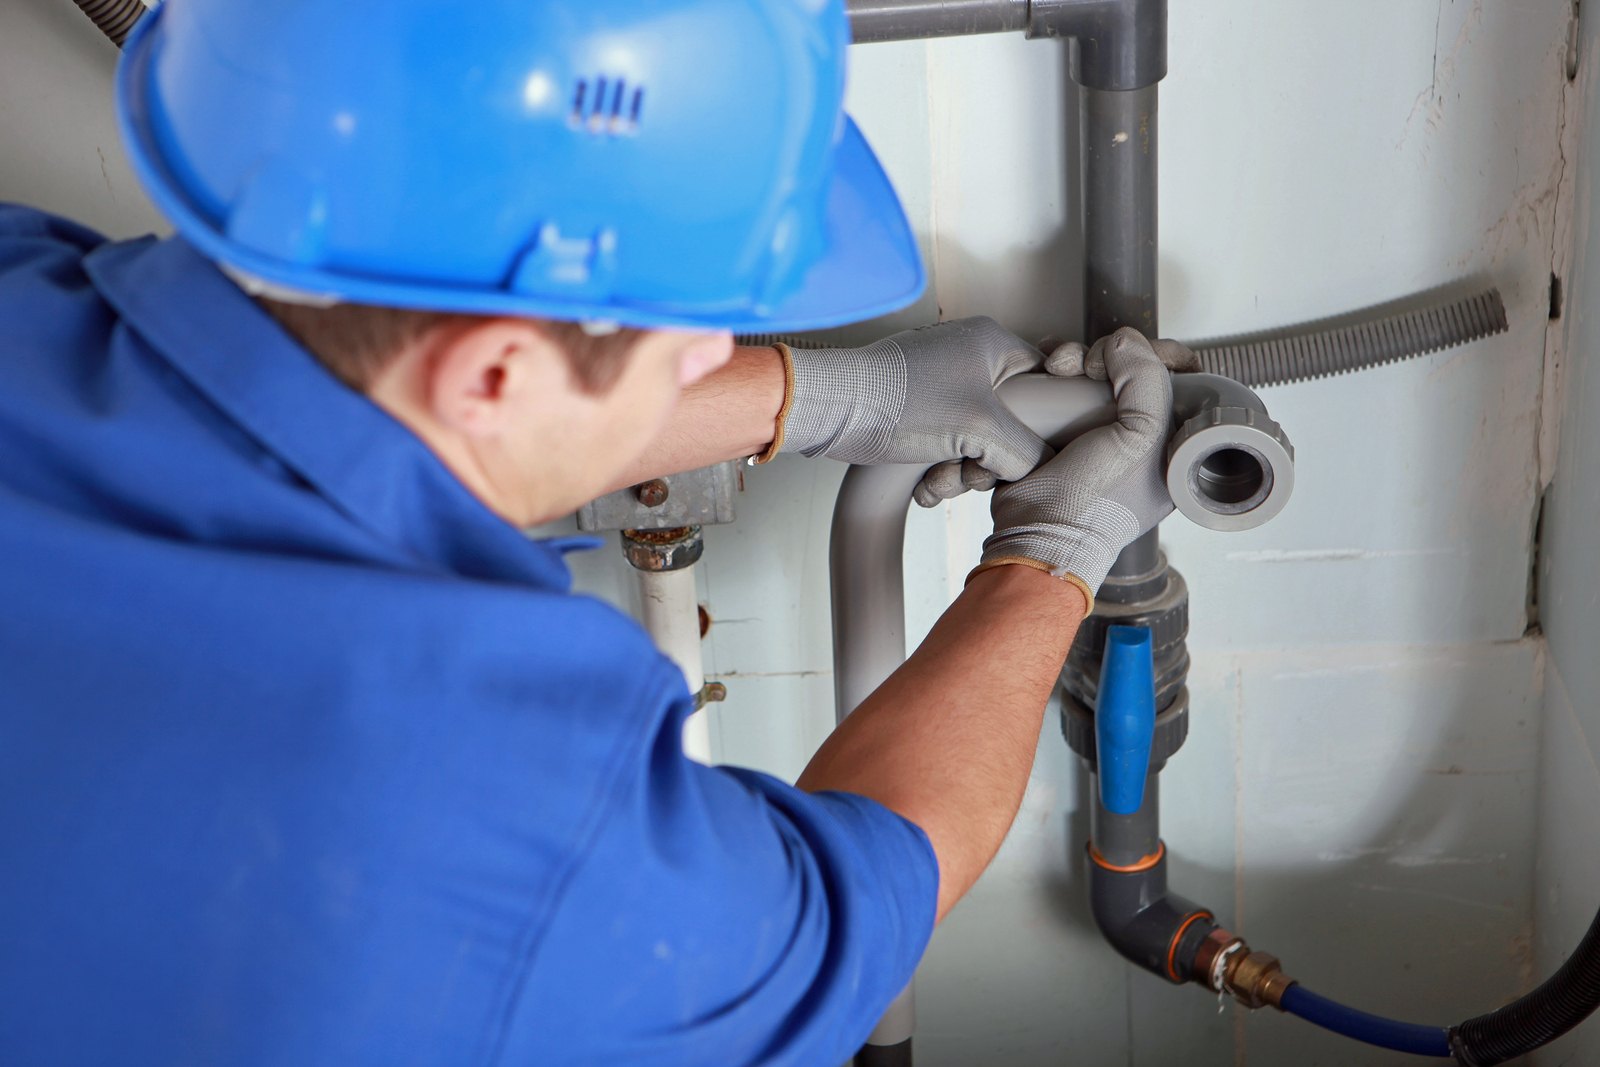
Taking apart the Faucet
Now that you've switched off the water, it's time to dismantle the faucet.
Initially, collect the essential devices and prepare your work space.
After that, meticulously eliminate the faucet parts, determining each piece as you go.
Prepare the Work space
Normally, you'll need to take apart the faucet to resolve a leaky concern. Before you start, it's essential to prepare your work space. Start by gathering all the necessary tools and materials, such as a container or pail to capture water, a collection of pliers, a basin wrench, and a towel.
Next off, concentrate on workspace company. Clear a clean, well-lit location where you can pleasantly work on the tap. This will certainly help you track the little parts and help with a smooth disassembly procedure.
Remember to take safety and security precautions by switching off the water supply to the tap and validating the area is completely dry to stop any kind of slides or drops.
With your office ready, you can currently begin the disassembly procedure. Take your time and work systematically, maintaining the components organized and classified to make the reassembly less complicated.
Determine Faucet Parts
With your workspace prepared, you can start taking apart the faucet to recognize its elements.
Begin by situating the faucet manage and eliminating it, which will subject the faucet stem. The stem is the main device that regulates the water flow. Next off, eliminate the packing nut, which protects the stem in place. As soon as the stem is out, you'll see the washer and the valve seat. The washer is a rubber disc that secures the water flow, while the valve seat is a brass or plastic element that the washer presses against.
Below the valve seat, you'll find the faucet cartridge or the faucet's inner system. Depending upon the tap kind, this can be a single-lever or a revolving round.
Acquaint on your own with the function of each part, as this will assist you identify the source of the leak and make the necessary repair services. With a clear understanding of the tap's makeup, you'll be better outfitted to repair the dripping problem.
Disassembly Treatment
To start the disassembly process, you'll want to shut off the supply of water to the faucet. This is normally done by situating the shut-off valves underneath the sink and transforming them clockwise until the water circulation quits.
As soon as the water is turned off, you can eliminate the faucet take care of, which may require a little hex wrench or a tap handle puller device.
Next, you'll require to eliminate the faucet stem, which is the component that regulates the water circulation. This may involve unscrewing a preserving nut or clip, and then meticulously pulling the stem out. Make certain to note the order and alignment of any washing machines or springtimes, as they'll need to be re-installed correctly.
With the tap stem removed, you can now access the interior components, such as the cartridge or valve seat and spring. These components may require to be cleaned up or changed as part of your tap upkeep.
Remember to have the needed substitute components available before starting the disassembly procedure. By correctly dismantling and preserving your tap, you can assist enhance its efficiency and stop future leaks.
Replacing the Washing Machines or O-rings
The very first step in fixing a dripping tap is replacing the used washing machines or O-rings. You'll require to disassemble the tap to access these components, which may have ended up being harmed or dried out in time, triggering the leakage.
Commonly, washing machines are made from rubber or plastic, and you'll intend to match the product with the original. O-rings come in different dimensions and products like nitrile or silicone, so bring the old one with you to the hardware store to find the best replacement.
When you've obtained the new washing machines or O-rings, thoroughly rebuild the faucet, ensuring every little thing is effectively straightened and tightened up. Check the faucet, and if the leakage persists, you may require to change added inner components like the springs or seats.
With a little elbow grease and the right replacement components, you can rapidly obtain that pesky leakage controlled and enjoy a drip-free faucet once again.
Reassembling the Faucet
When reconstructing the faucet, make certain to disassemble the parts thoroughly.
Inspect the washers or O-rings thoroughly for any kind of signs of wear or damages.
Carefully place the faucet back with each other, making certain that all the components are correctly lined up and tightened.
Take Apart Parts Thoroughly
Rebuilding the tap requires mindful attention, as a single misaligned component can endanger its performance. As you start this process, be sure to follow appropriate security precautions. Use gloves to safeguard your hands, and operate in a well-lit location to assure you can see each item plainly.
Beginning by remembering of just how the parts were initially organized. This will make it simpler to place the faucet back with each other correctly. Carefully place the parts in the order they were eliminated, double-checking that every little thing is straightened effectively. Take your time and prevent rushing - a few extra minutes now can save you from needing to disassemble the faucet again later.
Once the tap is completely reassembled, run some upkeep tips to ensure a proper seal. Activate the water gradually and look for any kind of leaks. If whatever looks great, you're ready to enjoy your freshly fixed tap.
Check Washers Completely
Before reassembling the faucet, extensively inspect the washing machines for any indications of wear or damage. Validate the washing machines remain in great problem, as harmed or ill-fitting washing machines can lead to consistent leakages. Replace any type of washing machines that show up split, dried, or incapable to produce a proper seal.
The most typical washing machine products are rubber, neoprene, and plastic. Examine each washing machine very closely, guaranteeing it's flexible yet not brittle. Search for any type of cracks, splits, or excessive compression that can stop a limited seal. If the washing machines appear used, replace them with brand-new ones that match the tap's requirements.
Once you've confirmed the washing machines remain in excellent form, thoroughly reassemble the tap, keeping in mind to lube the moving parts. Gradually transform the water back on and check for any drips or leakages. If the tap still trickles, you might need to replace additional components or look for expert support.
Effectively evaluating the washing machines is a crucial action in dealing with a dripping faucet.
Detecting Radiator Noise
Determining the resource of the radiator sound is the first step in resolving the problem. You'll want to pay attention carefully to recognize whether the audio originates from the pipelines, shutoffs, or the radiator itself.
Start by checking the shutoffs - are they opening up and shutting effectively, or exists a rattling audio that suggests a trouble? Next off, check the pipelines for any kind of banging or knocking noises, which can signify an issue with the water circulation or air pockets in the system.
If the sound seems to be coming straight from the radiator, it's time to dig a little much deeper. Radiator maintenance is crucial - the sound might be triggered by a buildup of sediment or mineral deposits inside the device.
Try bleeding the radiator to launch any trapped air, which can often lower noisy operation. Furthermore, you might require to flush the system or perhaps change the radiator if the noise is consistent.
Appropriate diagnosis and timely action will assist guarantee sound reduction and recover comfort in your house.
Bleeding the Radiator
If the sound appears to be coming straight from the radiator, hemorrhaging it can often decrease loud operation.
Begin by recognizing the radiator's bleed shutoff, normally located at the top or side of the unit. Utilize a radiator key or a flathead screwdriver to gradually transform the shutoff counterclockwise, enabling any type of trapped air to escape.
As the air is launched, you might listen to a hissing audio. Proceed transforming the shutoff up until water starts leaking out, after that shut it back up. This procedure of bleeding the radiator is an essential part of radiator upkeep, as it assists enhance heating efficiency by making certain appropriate air blood circulation.
Keep in mind to be careful, as the water launched might be hot. Have a cloth or container ready to catch any drips.
Repeat this process on each radiator in your house until the sound is reduced or removed. Routine bleeding can assist expand the life-span of your heater and keep it running efficiently.
Addressing Radiator Problems
Attending to radiator problems may call for analyzing the unit's heating effectiveness, recognizing any leakages, and addressing underlying reasons like air pockets or mineral accumulation.
Begin by checking for noises coming from the radiator, which could suggest problems like loosened components or trapped air. You can often fix this by hemorrhaging the radiator to launch any type of trapped air, which should aid improve its performance and decrease sound.
Next off, inspect the radiator for any kind of signs of leaks, such as water stains or leaking. Leaks can be caused by splits, deterioration, or damaged valves, and should be dealt with quickly to stop more damages and water waste. Think about hiring a professional plumber if you're incapable to find and fix the leak on your own.
Furthermore, routine radiator maintenance, like purging the system to eliminate mineral accumulation, can help enhance its efficiency and decrease the danger of concerns like banging or whistling sounds.
Often Asked Concerns
Can I Make Use Of WD-40 to Quit a Leaky Tap?
No, you should not utilize WD-40 to stop a leaking faucet. While it may briefly mask the issue, it will not really fix the underlying trouble.
Instead, try these tap maintenance pointers: take apart the faucet, clean, and replace used washing machines or seals.
Use silicone-based lubricants like plumbing professional's oil.
There are likewise lots of efficient WD-40 choices, like vinegar or sodium bicarbonate, that can help clean and keep your tap without causing further damage.
Just how Do I Know if My Radiator Needs Hemorrhaging?
You can tell if your radiator requires hemorrhaging when you notice some usual radiator signs like amazing places, gurgling sounds, or reduced heat outcome.
The bleeding procedure includes launching trapped air from the radiator system to improve warmth flow.
Begin by situating the bleed shutoff, generally on top of the radiator, and use a radiator trick to slowly open it until water starts coming out.
Then close it once the hissing noise stops.
What Should I Do if the Tap Is Stuck?
If your faucet manage is stuck, don't force it.
First, attempt carefully turning it back and forth to loosen it up.
If that does not work, you might require to dismantle the faucet for a more complete evaluation.
Check for any kind of accumulation or mineral deposits that could be creating the deal with to stick.
With a little bit of careful faucet maintenance, you can usually obtain that stuck manage relocating easily once more.
Can I Repair a Leaky Radiator Myself?
You can absolutely repair a leaking radiator yourself! toilet installation cost
Begin by inspecting the radiator for any kind of indications of leaks. Search for drips or damp areas around the shutoffs, pipelines, or joints.
Once you have actually determined the resource of the leak, you can try tightening up the connections or replacing any used gaskets or seals.
With some standard radiator upkeep and leakage detection skills, you can get that pesky leakage spruced up quickly.
Just how Commonly Should I Check My Radiator for Issues?
You should inspect your radiator for issues regularly as component of radiator maintenance. Objective to inspect it at the very least once a year to capture any kind of prospective leaks early.
This will assist prevent water damages and costly repairs down the line. Look for any type of visible indications of leak, and listen for any kind of uncommon noises that could indicate a problem.
Taking these basic actions will certainly go a lengthy means in leakage prevention and maintaining your radiator in top form.
Conclusion
As soon as you have actually determined the faucet type and collected the needed devices, shut off the water system and disassemble the tap.
Change any type of worn washing machines or O-rings, then reassemble it.
When it comes to the loud radiator, examine the shutoff, evaluate the pipelines, and bleed the radiator to launch any trapped air.
Routine maintenance can aid stop future concerns and keep your home running smoothly.